Replacing the 02 Sensor Mazda 3: A Step-by-Step DIY Guide
As a proud owner of a Mazda 3, you know that regular maintenance is key to keeping your vehicle running smoothly and efficiently. But sometimes, more serious repairs are needed, and that’s where DIY skills come in handy. One of the most common issues that can arise in a Mazda 3 is a faulty O2 sensor, which can cause decreased fuel efficiency, rough engine performance, and even damage to the catalytic converter. While replacing the 02 Sensor Mazda 3 can seem like a daunting task, with the right guidance, it can be a relatively simple and cost-effective repair.
Introduction to the O2 Sensor Replacement Process
Are you a DIY enthusiast or a Mazda 3 owner looking to save some money by replacing the oxygen sensor in your vehicle yourself? You’ve come to the right place. In this comprehensive guide, we will walk you through the step-by-step process of replacing the O2 sensor in your Mazda 3. The O2 sensor, also known as the oxygen sensor, is a crucial component of your vehicle’s emissions system, responsible for monitoring the amount of oxygen in the exhaust gases. Over time, the O2 sensor can become faulty, leading to decreased fuel efficiency, poor engine performance, and potentially even causing damage to other engine components.
Replacing the O2 sensor in your Mazda 3 is a relatively straightforward process, requiring minimal tools and mechanical expertise. With this DIY guide, you’ll be able to replace the O2 sensor in your vehicle, saving you money on labor costs and giving you a sense of accomplishment and pride in your abilities. In the following sections, we’ll cover the necessary tools and materials, step-by-step instructions, and troubleshooting tips to ensure a successful replacement process. So, let’s get started!
Why Replace the O2 Sensor In Your Mazda 3?
As you drive your Mazda 3, you’re probably relying on a silent hero to help your vehicle run smoothly and efficiently. The oxygen sensor, also known as the O2 sensor, is a crucial component that plays a vital role in your car’s engine management system. Its primary function is to monitor the oxygen levels in your vehicle’s exhaust system, sending vital information to the engine control unit (ECU) to adjust the air-fuel mixture accordingly.
Over time, the O2 sensor can become damaged or worn out, which can lead to a range of issues, including decreased fuel efficiency, reduced engine performance, and even the infamous “check engine” light illuminating on your dashboard. In some cases, a faulty O2 sensor can even cause your vehicle to fail an emissions test, leading to costly repairs and fines.
If you’ve noticed any of these symptoms, replacing the O2 sensor in your Mazda 3 is a task that’s well worth undertaking. With this DIY guide, you’ll be able to save money and avoid the hassle of taking your vehicle to a dealership or repair shop. By the end of this step-by-step guide, you’ll be equipped with the knowledge and confidence to successfully replace your O2 sensor and get your Mazda 3 running like new again.
Step-By-Step Guide to Removing the Mazda 3 Oxygen Sensor
With the Mazda 3 Oxygen Sensor located in a relatively accessible area, you’re now ready to begin the process of removing it. This is a crucial step in the replacement process, as it requires a bit of finesse and attention to detail to avoid damaging any surrounding components. Begin by locating the O2 sensor, which is typically attached to the exhaust manifold on the driver’s side.
Using a 14mm socket wrench, loosen the O2 sensor nut by turning it counterclockwise. Be careful not to remove the nut entirely, as you’ll need to use it to guide the sensor out of its mounting bracket. Once the nut is loose, gently rock the O2 sensor back and forth while pulling it away from the exhaust manifold. This will help dislodge it from its housing and allow it to be removed.
As you remove the O2 sensor, be mindful of the wiring harness that connects it to the engine computer. You may need to gently manipulate the harness to avoid kinking or damaging the wires. With the O2 sensor out of the way, you’ll have clear access to the mounting bracket and can proceed with the next steps in the replacement process. Remember to take your time and work carefully to ensure a successful and stress-free removal of the O2 sensor
 .
.
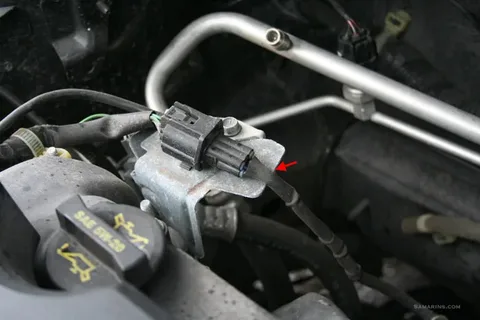
Removing the Harness Connectors
Removing Harness Connectors and Plastic Retaining Clips
As you continue to disassemble the engine compartment, you’ll encounter the harness connectors that link the various components together. These connectors are secured in place with plastic retaining clips, which can be a bit tricky to remove. But don’t worry, with the right technique and a bit of patience, you’ll be able to remove the harness connectors without damaging them.
Locating and Gently Pulling the Connector
To begin, locate the connector you want to remove and gently pull it away from the engine compartment. You may need to wiggle it a bit to dislodge it from its retaining clips. Once you’ve got some slack, you can focus on removing the connector itself. This initial step helps create the space you need to work on the connector safely.
Releasing the Locking Tab
Start by releasing the locking tab on the connector, which is usually a small lever or button that needs to be pushed or flipped down. This will allow you to slide the connector off the harness. The locking tab is a safety feature to ensure the connector stays in place during operation, so handle it carefully to avoid breaking it.
Disconnecting the Electrical Wires
Next, you’ll need to disconnect the electrical wires from the connector. This may involve pulling on the wires gently or using a small amount of force to dislodge them from their retaining clips. Be careful not to touch any of the wires to any metal surfaces, as this can cause damage to the electrical system. Ensuring that the wires are handled gently and correctly is crucial to prevent any accidental shorts or damage.
Disconnecting the Suzuki Swift Oxygen Sensor Problems Electrical Connections
As you prepare to remove the Suzuki Swift Oxygen Sensor Problems it’s essential to properly disconnect the electrical connections to prevent any damage or electrical shock. Locate the electrical connectors that are attached to the O2 sensor, which are typically located on the driver’s side of the engine compartment. You’ll notice two connectors, one for the sensor’s power wire and the other for the sensor’s signal wire.
The power wire connector is usually a yellow or orange wire with a 4-pin or 6-pin connector. This wire supplies power to the O2 sensor and is usually marked with a label stating “O2 Sensor” or “Lambda Sensor”. Gently pull the connector off the O2 sensor by prying it loose with your fingers or a plastic tool. Be careful not to touch any of the exposed wires or terminals.
The signal wire connector is usually a black or blue wire with a 2-pin or 4-pin connector. This wire transmits the sensor’s signal to the engine computer. Disconnect the signal wire connector by pulling it off the O2 sensor, taking care not to touch any of the exposed wires or terminals.
Removing the O2 Sensor Mounting Bracket
One of the most critical components of the Mazda 3’s engine management system is the oxygen sensor, responsible for monitoring the exhaust gases and providing vital information to the vehicle’s computer. As you navigate the process of replacing the O2 sensor, it’s essential to carefully remove the mounting bracket that holds the sensor in place. This may seem like a daunting task, but with the right guidance, it’s a manageable step.
To begin, locate the O2 sensor mounting bracket, which is attached to the exhaust manifold. You’ll notice that it’s held in place by a few screws and clips. To access the bracket, you’ll need to use a combination of tools, including a socket wrench and a Torx screwdriver. Start by removing the screws that secure the bracket to the exhaust manifold, taking care not to strip the threads.
Once the screws are removed, you’ll need to pry the bracket away from the manifold. This may require some patience and gentle manipulation, as you don’t want to damage the surrounding components. As you work, be sure to keep an eye on any wires or hoses that may be connected to the bracket, as you’ll need to disconnect them before proceeding.
Reconnecting the Oxygen Sensor Suzuki Swift
As you’ve successfully replaced the Oxygen Sensor Suzuki Swift, it’s time to reconnect the harness connectors to ensure a secure and watertight seal. This is a crucial step, as any loose or damaged connections can lead to poor engine performance, decreased fuel efficiency, and potentially even damage to your vehicle’s engine.
Begin by locating the two harness connectors that were previously disconnected. You should find them easily, as they are typically labeled with the Oxygen Sensor Suzuki Swift part number. Take a moment to inspect the connectors for any signs of damage, such as corrosion, cracks, or worn-out pins. If you notice any damage, it’s essential to replace the affected connectors to prevent further issues.
Once you’re satisfied that the connectors are in good condition, gently push the male end of the harness connector into the female end of the O2 sensor housing. Make sure it clicks into place, indicating a secure connection. Repeat this process for the second harness connector.
Next, take a moment to inspect the connectors’ seals and ensure they are free of debris and moisture. This is crucial, as any contamination can compromise the connection and lead to premature failure.
Conclusion
As you’ve navigated the pages of our DIY guide, we hope you’ve gained the confidence and skills to tackle the replacement of your Mazda 3’s O2 sensor with ease. With this step-by-step guide, you’ve saved yourself the hassle and expense of a trip to the mechanic, and have taken control of your car’s maintenance. We’re thrilled to have empowered you with the knowledge and expertise to tackle this job, and we’re confident that your Mazda 3 will run smoother and more efficiently than ever before. Now, get out there and show your car who’s boss – and don’t forget to share your experience with us!
FAQs
What are the signs that my Mazda 3’s O2 sensor needs replacing?
Common signs include a check engine light, poor fuel economy, rough idling, engine misfires, and failed emissions tests.
Can I replace the O2 sensor in my Mazda 3 myself?
Yes, with basic mechanical skills and the right tools, you can replace the O2 sensor yourself by following a step-by-step guide.
What tools do I need to replace the O2 sensor in a Mazda 3?
You will need an O2 sensor socket, a ratchet and extension, a torque wrench, and penetrating oil.
| Other Good Articles to Read |
| Blogs-Nation |
| Blogs-Peoples |
| Bryan Smith Blogs |
| intellect blogs |
| the fault in our blogs |
| blogs eu |
| oz forums |
| recruitment blogs |
| zet blogs |
| id blogs |
| Blog Studio legale |
| blogs map |
| Related Business Listings |
| Contact Directory |
| Local Business Profiles |
The post Replacing the 02 Sensor Mazda 3: A Step-by-Step DIY Guide appeared first on CME Blog Spot.
from CME Blog Spot https://ift.tt/rvP4wBg
via IFTTT
